WordPress Navigation Menus were introduced in version 3.0. All our WordPress Themes have support for this super easy and simple feature.
Creating a Navigation Menu↑ Back to Top
Follow these steps and within minutes you’ll have a nice navigation menu and a complete understanding on how it works:

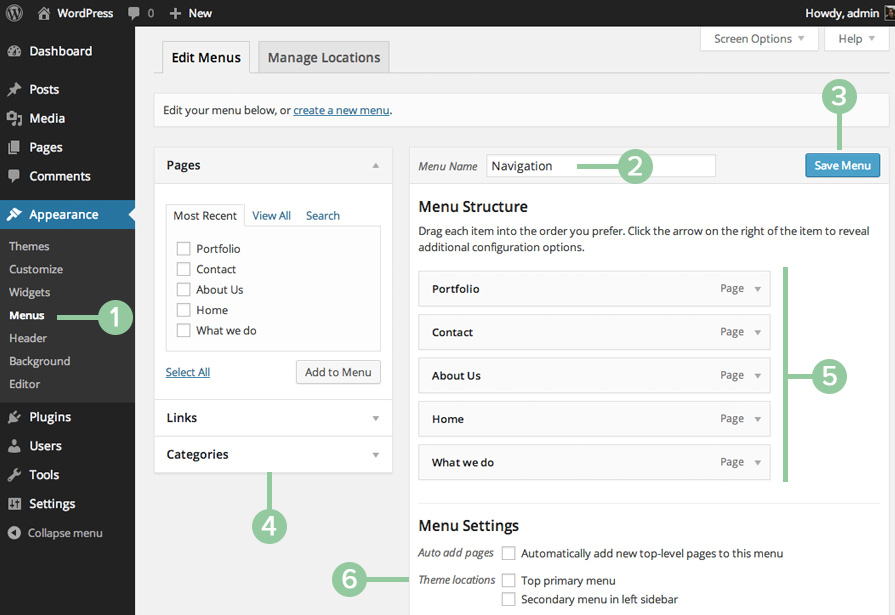
Figure 1: “The Appearance > Menus” screen.
- Log-in to Your WordPress Dashboard and go to Appearance → Menus
- Insert a name for your menu, if you have none.
- Click on “Create Menu” if you don’t have any, or “Save Menu” if you already have one and you want to update it.
- Once you have your menu, you can add Pages, Categories or Custom Links. To add pages or categories check the box beside and add them by clicking the button. To add custom links fill in the URL and Label fields and click the “Add to Menu” button.
- Freely organize it by dragging and dropping items from your menu, putting them in the order you want or creating sub-menus (simply giving hierarchy to the structure). Remember to save the changes when you are finished.
- Assign your menu to a theme location. This is really important, because it will be the location in which the menu you’ve created and edited will be appearing.
If you want to add other types of content to your menu on step number 4 and you don’t see the box containing the items, click the “Screen Options” button on the top right part of the screen, and select what boxes you want to have.
Ordering menu items↑ Back to Top
As mentioned in step number 4, it is really simple to set an order for items. You just need to drag and drop each item in the place you want it to appear.

Setting sub items, and hierarchies↑ Back to Top
You just need to drag and drop each item horizontally.


