Category Archives: Development

Smart 1.0.3 is now available

We’re glad to announce the release of Smart 1.0.3, which is the most powerful version of our theme to this day. This release comes packed with a lot of improvements, fixes and new features that we’re sure you’re really going to like, so let’s get into the most important details.

Visual Composer’s Front-End Editor

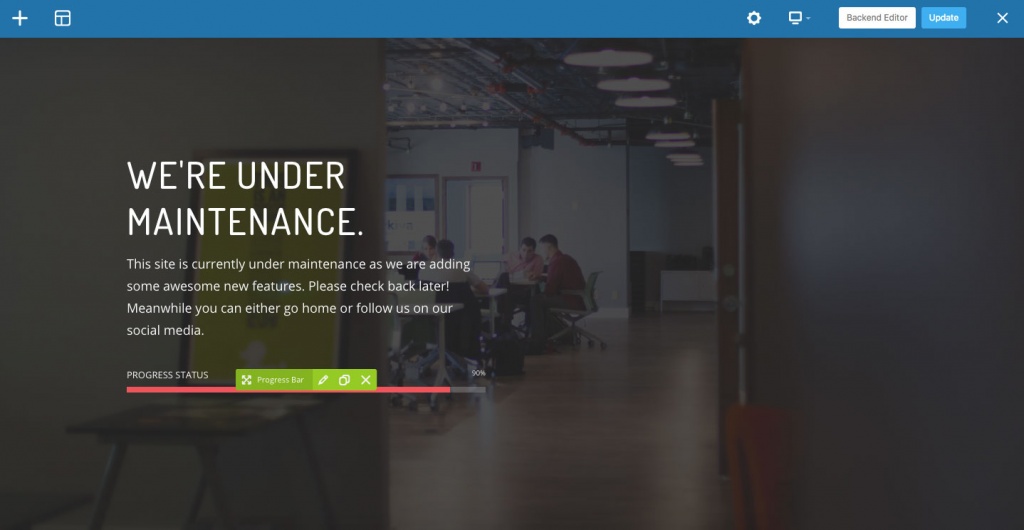
Since this version, we’re including in Smart this very much requested feature of Visual Composer, which will help you preview your pages while you’re creating them. We have written a helpful article explaining how to use this new feature, which you can find here.

Transparent header for mobile viewports

Something that web designers need often is to use a transparent background for their site’s header. The default behavior for Smart’s transparent header is to fallback to a solid background on mobile viewports, but some users expressed the need to show a transparent header for mobile sizes too. Before Smart 1.0.3, that was only possible by adding some custom CSS, but now we have made this feature available through the Theme Settings page, in “Header > Design > Transparent Header (Mobile)”.

Sticky header for mobile viewports

Sticky or fixed site headers are very popular, since you can make your site’s main navigation area “follow” your visitors while they scroll down a page. Sometimes that is not a recommended practice for the mobile version of a site, since the header can take a lot of space in small devices, and that’s why Smart doesn’t enable sticky headers in mobile by default. However, not all sites are built the same, so since version 1.0.3 you can also have a sticky header for mobile viewports by checking the option in “Theme Settings > Header > Animation > Fixed Position Header (Mobile)”.

WPML certification

The team behind WPML tested Smart recently and they just certified the theme as multilingual ready. Smart 1.0.3 includes some adjustments for our WPML integration, such as new styles for the language switchers, matching the general look and feel of the theme. Read more about this here.

Better PHP Performance

As you may know, one of our main goals for Smart is to make it fast and stable. We’ve been working hard on that since the theme’s first available version, and we just went a step further in Smart 1.0.3, where we implemented a new PHP file loading method and reorganized our folder structure to make loading times shorter. Please note this new file loading method is only available if you are using our framework’s version 2.0.6 or higher.

Wrapping Up

So those are the most important items for this version, but there’s also a lot of minor improvements and fixes. You can check the full list here.

Get Smart 1.0.3

If you’re already using Smart, we recommend to update both theme and framework to get all the latest features and improvements. Just register your copy on “Smart > Product Registration” inside your site’s admin panel, then go to “Smart > Support & Updates”, and get the newest versions there.

And if you still don’t have Smart (why?), or in case you need an additional license for a new site, you can get it from ThemeForest right here.

Where are the demo sites?

You can check a whole lot of things you can do with Smart on our demo site. In fact, you can even use our One-Click Importer, which is included in the theme, to replicate any of those sites into your own WordPress installation, so you don’t need to start everything from scratch.

What’s next for Smart?

We’re currently working on our next major release, Smart 1.1, which will include some great new customization features, by extending and improving our compatibility and integration with popular plugins, such as WooCommerce, Visual Composer and Slider Revolution.

And, as we’ve been saying, even tough Smart is the fastest multipurpose theme you can find, we’re always working on performance improvements, so your site gets even faster with every major update.

So just go update Smart to version 1.0.3 and get a lot of new features to build your website.

Smart is now certified by WPML

Hi there, everyone! You may have already guessed what we’re about to tell you by just reading the title, but let us guide you through some fine details.

In the past few weeks, we’ve been working hard on a new release of Smart, our great multipurpose theme. Version 1.0.3 comes with a lot of improvements, fixes and new features (which we’ll cover in another article), but there’s one that stands out: Smart is now certified to be 100% compatible with WPML.

Continue reading »

Upcoming changes, goodbye Timthumb

When we made our first approach to design the structure of our theme framework, we decided that the best way to handle images would be using the timthumb script. It is widely used by loads of WordPress theme developers. We considered that it was really powerful in the sense that it can dynamically change the size of any image, even making them bigger in size, crop them, etc. Now that we have a customer base, and our themes are used in – we can gladly say – thousands of websites, the common denominator across our support base was problems with images.

On our previous theme releases – since the framework version 1.0.5 – we’ve included an option to pick the WordPress native image functions to handle images, instead of the timthumb script. The intention of this was to prepare the field for our next step, which will be removing timthumb from all our themes.

So we highly recommend that, in case you’re still managing images with timthumb on your site, you update the option to the WordPress native functionalities in order to prepare for the upcoming changes in both theme and framework versions.

To achieve this, first make sure that your theme is up to date. Then, just go to your Theme Options Panel and find the “Images” section on the left hand menu.

Pick the WP Dynamic Resizing and the Image cropping option.

If you get to see that your site’s images look awkward, you must regenerate the thumbnails. You can simply get this done by using the “Regenerate thumbnails” plugin.

 Thanks for stopping by.

Some nice updates, presenting the new Twitter Widget.

We would like to thank our growing community for the continuous amazing feedback, support and patience while we were setting up some of the new features and updates.

Since last week, after the launch of Paeon, we’ve been working hard in order to release several updates regarding some fixes for our current themes. The main fix, and actually the most important one for our users – the one most people had been asking for – is the Twitter Widget update.

Some time ago, Twitter announced that they are officially turning off version 1.0 of their API. In plain english, this means they change the rules for developers in order to communicate with their services. They moved to version 1.1 of their API (unfortunately, this is out of our control). Technically speaking, this new version requires authentication for any request made to the Twitter servers, which means that all Twitter applications and code snippets would need to be updated to use this new version.

Today, we’d like to inform you that BBQ, Netelier and Bref have been updated, and this new update includes support for Twitter API version 1.1

This new version of the Widget requires some configuration regarding authentication as previously mentioned in this post. So, I will try to explain what you need to do in order to have the new widget working. If you find any difficulty, please feel free to post a new topic in our forums.

How do I set up my Twitter Widget?

The setup process may seem a bit confusing at first, but it only takes a few minutes and is a one-time configuration.

In order to configure the Twitter Widget you need to do the following:

  1. Visit http://dev.twitter.com/apps/new
  2. Login or make sure to login as Twitter account used on website to display tweets
  3. Type the following on input fields:

    Name: [Your Site Name] Twitter Widget
    Description: Display twitter feeds on website
    Website: [Your website URL]
    Callback URL: (leave blank)

  4. Check on “Yes, I agree” and fill the CAPTCHA
  5. Once the application is setup, copy and paste the application OAuth settings into your Twitter Widget Configuration. (Consumer and Consumer Key)
  6. Back on Twitter click “Create my access token”, then copy and paste the recently created Access Token into your widget configuration back on your website.
  7. On the Widget Configuration on your website, change the Username name to your Twitter ID without @ symbol. Complete the other fields if necessary (Include Retweets, Exclude Replies & the number of tweets to show).
  8. Save the Widget settings.
  9. Voilá, your tweets should be displaying by now.

Some nice updates

Besides the already mentioned Twitter widget update, we’ve been working on adding and fixing several technical issues across the themes. On top of solutions to technical issues you’ll find out that:

  • On BBQ and Netelier there’s a new “Back to top” functionality that you can activate from the Theme Options.
  • There’s a renovated experience on the managing of custom post types (Slides, Info Boxes, Menus, Portfolios, etc).
  • On BBQ there’s a nice effect for the home page, and the gallery templates.
  • You can now use .ico files for your favicon, not just PNGs

NOTE: You can check all the updates in the changelog.txt file within your theme folder.

We hope you enjoy these new features and updates. That’s all for now, stay tuned

Login to your Account

Welcome back! Please log in to your account by filling the fields below:

Forgot?

Not a member? Create a free account.

Create a Free Account

You're 27 seconds away from some awesome WordPress free stuff, benefits and more. Create a free account and have access to our free products, benefits and more!

Already have an account? Log in
Secure Server